
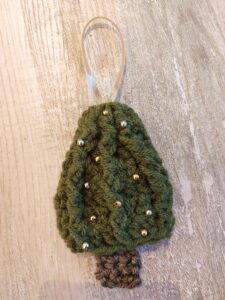
Add to your holiday decor with this charming Christmas Tree Crochet Ornament! These cute festive tree ornaments will beautifully complement any of your Christmas decor & also make a beautiful addition to a wrapped present in lieu of a bow.
This pattern features the back post double crochet stitch (BPdc), front post double crochet stitch (FPdc) as well as the double crochet (dc) & single crochet stitches (sc).
Get creative by mixing and matching yarn colour combinations to personalise your trees. For an added touch, embellish your trees with beads and/or sequins.
Get ready to spread holiday cheer with your handmade creations!
Easy Crochet Christmas Ornament
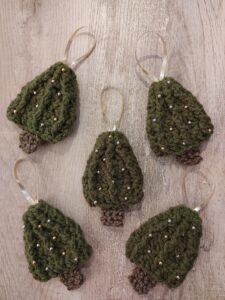
You’re going to fall in love with these quick and easy tree ornaments! Embellished with beads or just left plain, they’re so simple to make, you can whip up a bunch in just one day. It is a great project to use up some yarn you have left in your yarn stash. Make them in fun colours! Every holiday season feels like the perfect time for fresh, new ornaments!
I hope you enjoy making this pattern and have fun adding a handmade touch to your holiday decor!
SUPPLIES
-Worsted Weight yarn in green (or any colour that you want the main part of your tree to be) & brown for the trunk
-4 mm crochet hook
-ribbon or string
-beads or sequins (optional)
-thread (for beads/sequins)
-needle (small enough to sew beads/sequins on), & yarn needle (to stitch your tree front & tree back & trunk together)
You can make larger or smaller trees by using yarn of larger or smaller weight.
ABBREVIATIONS
Ch: chain
Sl st: slip stitch
Dc: double crochet
BPdc: back post double crochet
FPdc: front post double crochet
sc: single crochet
RS: right side
WS: wrong side
PATTERN
Tree (make 2)
Using your green yarn, make loop.
Row 1 (RS): Ch 4. Into the first ch work 4 dc into that ch. Turn.
Row 2 (WS): Ch 3. Work 1 BPdc into each of the next 3 sts. Work 1 dc into the top of the ch 3 from the previous row. Turn.
Row 3 (RS): Ch 3. Work 1 FPdc + 1 dc into the next st. Work 1 FPdc into the next st. Work 1 dc + 1 FPdc into the next st. In the last st work 1 dc. Turn.
Row 4 (WS): Ch 3. Work 1 BPdc in the next st. In the next st work 2 dc. Work 1 BPdc in the next st. Then 2 dc in the next st. Work 1 BPdc in the next st and 1 dc in the last st. Turn.
Row 5 (RS): Ch 3. Work 1 FPdc in the next st. Then 1 dc in each of the next 2 sts. Work 1 FPdc in the next st. Work 1 dc in each of the next 2 sts. Work 1 FPdc in the next st and 1 dc in that last st. Turn.
Row 6 (WS): Ch 3. Work 1 BPdc in the next st. Work 1 dc in each of the next 2 sts. Work 1 BPdc in the next st. Work 1 dc in each of the next 2 sts. Work 1 BPdc in the next and 1 dc in the last st. Turn.
Row 7 (RS): Ch 3. Work 1 FPdc in the next st. Work 1 dc in each of the next 2 sts. Work 1 FPdc in the next st. Work 1 dc in each of the next 2 sts. Work 1 FPdc in the next st and 1 dc in last st. Cut yarn and tie off.
Trunk (make 1)
Row 1: Ch 4. In the second ch from your hook work 1 sc and in each of the next 2 sts. Ch 1, turn.
Row 2: Work 1 sc in each st across. Ch 1, turn.
Repeat Row 2 3 more times. Cut yarn and tie off.
Here is the crochet stitch charts, if you prefer to stitch from these!


Now is the time to embellish your tree front and tree back with beads or sequins, if you so choose.
Cut your ribbon and sew onto the back of your tree front.
Attach the trunk of your tree as you attach your tree front and tree back together. Using your yarn needle sew the trunk to the front of your tree and then sew the tree front to the tree back.

I hope you enjoy this free pattern!
COPYRIGHT
The O’Christmas Tree Crocheted Ornament Pattern is fully owned and copyrighted by The Fibre Art Company, and all rights are reserved. This pattern and the finished product is protected by copyright and other intellectual property laws and the pattern may not be reproduced to be sold, but you may make these trees to sell at crafts sales.